 |
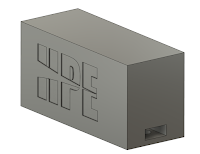
| 1.1 Mighty small handle 3D drawing. |
Contents
A) Intro - About the mighty small handle
B) Fitting guide
A) Intro - About the mighty small handle
 |
| 1.1 HPE Folding Tool kit handle CP PETg |
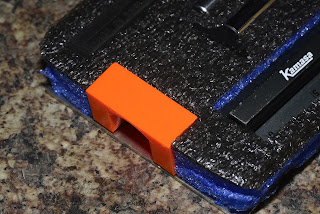
After the success of our folding tool kit handles, we decided we needed to go bigger, by going smaller. The idea was pretty simple; make a handle for smaller shadow foam shelves that could be removed from from a larger kit to enable small items to be brought closer to the work area whilst still keeping things organised. Design
Key elements were:
- They have to be very compact.
- Light weight.
- Be easy to use.
- be strong enough to support a wide range of tools.
 |
| fig 2.2 testing |
After some testing a final design was chosen with a base size taking up 40mm X 15mm of space each. Not bad at all!
Stress testing was carried out till we ran out of things to hand off of our test handle, ending up with an 8kg per handle load, a FoS (Factor of Safety) of 5. That is way more than is needed for this tiny little handle. In fact it is the same as the original bigger folding handles and these didn't fail!At just 7g per handle, including nuts, there is no need to shave these down to cut weight. They are perfect as they are.
B) Fitting guide
Fitting our tool kit handles is easy and adds a really professional look to your shadow foamed tool kit layers.
 |
| fig3.1 planning your kit |
Here we will walk you through how to fit them. However we will start a little before that just in case you are reading this whilst trying to decide what to buy. We have also peppered in a few suggestions on where to find items you will need with links or suggested brands in orange.Considerations before buying
You are going to need to know what things (tools) you intend to put in this container and how deep the foam will need to be for those things to sit flat. Remember, different depth foam requires different length mighty small handles.
Different foam colours can be used to help tool organisation. You may want to choose different colour handles to complement this or pick a material that better suits you needs.
We offer a wide range of colour and materials so don't hesitate to request exactly what you want.
Once you know this, you can workout a rough layout and figure out what size container is best for you (don't forget to leave room for the handles, factor in backing material and any protrusions).
You will probably bounce around these tasks a bit as you pick suitable tool boxes then seeing how you could reorganise your tools to make best use of the space.
Doing this now will save some wasted time and money later.
Your shopping list (tooling aside) will consist of:
- Tool box(Peli Case).
- Tool foam (Easy peel foam).
- suitable backing material (1mm alloy or composite fibre sheet).
- Mighty small handles to match the thickness of the foam, 1 set per layer 20/30/50mm .
- 4x M3 penny washers or spreader plate per layer.
- 4x M3 dome head fasteners per layer to secure the handles to the backing material:
Bolt length Formula
Once you have picked your easy peel foam and backing material you will now be able to order the correct length bolts for your handles.
| Base plate height | Formula | Formula cont' |
|---|
| 20mm | backing material + washer thickness + | 6 to 15mm |
| 30mm | -"- | 6 to 25mm |
| 50mm | -"- | 6 to 45mm |
| 30mm Example | 1mm + 1mm + 6 to 25mm | =8 to 27mm |
A longer bolt length may assist in handle strength but make sure it is not longer than recommended or it will damage the base plate.
We mention washers or spreader plates as an option as; if you have a thin backing material and a particularly heavy shelf, there is a chance the bolts may distort the backing material with their relatively small head surface areal. A flanged pan head M3 bolt would have a similar effect with less components.
For most, just using button head bolts will be fine and many have even gone for counter sunk screws for a flush fit without issue.
 |
fig 3.1
|
We anticipate that most will fit these handles either side of a removable tool kit shelf or segment as either an inner or out grip.
 |
| 3.2 outer grip |
With access to the outside, these handles can face outwards for an easy fit and a comfortable gripping surface allowing you to pinch the upper and inner surfaces of the handle.  |
| 3.3 Inner grip |
The more likely fit will be with the handles aperture facing inwards which will need an access hole to be cut, more on that later.
Fitting
 |
| 4.1 Meet Helpful PEte |
These handles work great and are easy to fit, but could they be easier?
Enter Helpful PEte (see what we did there?) the biodegradable, multi use, cutting and drilling guide for your mighty small handles. Pete doesn't look wildly excited about his job but he is rather good at it.Every order comes with one and PEte does make the process a lot easier.
1) Lay out your tools and handles where you want them to go. Make sure you are 100% happy that the right tools are on the right layer and that the layout is exactly how you want it.
2) Cut around each tool to the depth you want them to sit (so as deep as each tool if you want the layers to be flat). For the handles, cut all the way through the foam using the Helpful PEte as a template.
 |
| fig 4.2 cutting |
2b Optional) If you need a finger slot, you can use the template on Helpful PEte as seen in fig 4.2. The finger slot this template provides is as wide as the handle hole is and extended enough to allow comfortable access (not forgetting the foam will give) whilst not being too long, taking up valuable space. Note the finger gap doesn't need to be cut all the way to the base.
 |
| fig 4.3 marking holes |
3) Next Pete can be used to mark out where the bolt holes in the base materia need to be, as seen in fig 4.3. With the help of the alignment guide, this can be perfectly positioned for edge alignment as can be seen in fig 4.4. Alternatively Pete can be flipped over to allow him to sit flat whilst marking out the 3mm holes required wherever you want the handles to go. Next drill your 3mm holes in the base material and debur.
 |
| fig 4.4 alignment guide. |
When you are done with Helpful PEte, he can be stored flat in a room temperature dry place for future use or recycled. Being made of corn based PLA, he is decomposable too so he is a pretty guilt free purchase.
4) Now you can bolt your handles into place using penny washers to spread the load on the underside of the base material, taking care not to over torque the screws which could damage the plastic layers.
 |
| fig4.5 clamps to help gluing |
5) Glue down your foam using a spray or spreadable glue that will not dissolve the foam. Use a weight like a heavy book or clamps to help whilst the glue sets.
 |
| fig 4.6 Admire your hard work |


Comments
Post a Comment