New product - how we got there

Following on from last weeks blog on design from imagery, you may not be surprised to see that we have a new product to share with you, our first in fact.

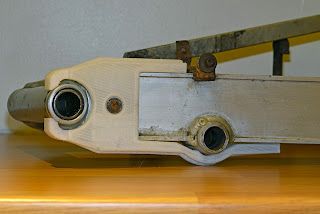
After finding the need to replace a broken swing arm infill on a Yamaha TZ250 C chassis; a replacement was designed in CAD software.
This has since been edited and fettled to produce an economical replacement for the 40 year old factory part. The key was to produce something that was faithful to the original part whilst still being economical to produce using 3D printing.
We will now take you through the process of designing this product before getting down to the specifications we finished upon.
Process
 The original part was produced in solid ABS using injection moulding. This is ideal for producing large numbers of a product but the production run here is unlikely to breach a few hundred so 3D printing is most suitable.
This comes with its own challenges and advantages. The initial costs and subsequent low volume unit cost are comparatively low but time and finish are a bit different. The now familiar layered textured surface lends itself well to sharp angled and flat surfaces with an especially smooth surface where the print is in direct contact with the printing bed.
 Complication occur with curves and overhangs. This has lead some design decisions that you can now see in the finished product. The most notable of which is the decision not to have a joggled bottom edge (if you look at the top image drawing you will see a vertical line towards the right of the render, this is where it should be) which aligns the lower bolt hole to the swing arm. This way the back face doesn't need to be lifted off the printing surface. This results in a better surface finish, stronger flat layers and wastes less material with support material.
A slotted lower hole allows for better bolt alignment despite this joggle not being in place and the material is compliant enough to conform to the desired shape.
The curved section in the middle has been retained to maintain clearance of the rear wheel when the chain is adjusted fully forwards. It is possible to print this without support material but the finish is poor so supports are used here.
Final adjustments were made after test fitting to give more clearance on the chain guide, add our logo and optimise the fit.
 Material and build choices were made with the aims of being damage resistant, light weight and easy to fit whilst also being quick and ethical to produce.
This lead us to the material choice of Polyethylene based PETg rather than ABS. Commonly used in the food industry (your plastic bottle will be made from a variation on PET) it is strong, ductile, light, reasonably heat resistant and doesn't produce toxic fumes when extruded. It also comes in a wide variety of colours which is a happy bonus.
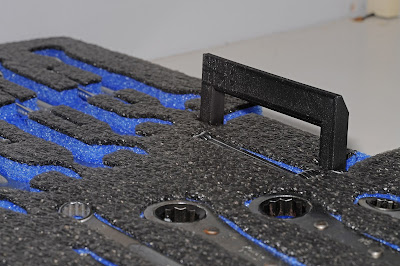
A relatively thick 5 layer upper and lower surface (1mm a piece) comprise the bulk of the thickness with a 15% infill giving this a similar characteristic to honey comb used in the aviation industry. You can see this in the clear infill shown here. This is optimal for strength vs weight.
a 3 layer perimeter has also been used here. This will help the product support the load of a torqued down fastener and also allow for a small amount of wiggle room should extra clearance be required or bolt hole alignment not be optimal (bolt holes are already 6.2mm to help with small variations in alignment along with the slotted lower hole).
The finished product
With the above taken care of you can expect something similar to the images in this blog. We will strip off support material, inspect and ship to order.
Colours can be picked from those available or others can be found for you to best match your custom build.
Alternative materials can also chosen (carbon fibre reinforced plastics anyone?) to the customers desire as well as changes in density to allow for machining or a lighter build.

If the 3D printed surface is undesirable for you you can hand sand the surface, taking care to not put too much heat into it or cut too far.
Another smoothing technique is achievable using chemical smoothing. Prusa have a great article on this, giving you another option.
Finally you may consider painting your product. 3D printed plastics can be easy to paint with their textured surface but for a smooth finish you will be looking to use some processes listed above first and maybe automotive body filler. A plastic primer will help with paint adhesion then its time to hit the paint colour of your choice. Again Prusa have a fantastic blog on this if you want to go deeper into painting.
Product care
PETg is an easy to maintain product. It is easily cleaned with warm soapy water. Avoid abrasives or strong chemicals as these can damage the material.
If the surface is holed/cracked the inner layer may fill with water/dirt. Damage may be repaired with an appropriate epoxy or plastic welding.
Slight layer separation or imperfection may hold moisture which in tern may hold contaminants leading to staining. This is common with 3D printed objects and isn't a concern unless the contamination is a chemical that attacks PET plastics.
You can learn a fair bit more on your choices with regards to customisation and post processing here.
You can get your swingarm infill panel on eBay here.
We would love to see and hear how you are getting on with your swingarm infill. Please send pictures and your feedback to us on facebook or in a comment below.


Comments
Post a Comment