Yamaha FZ600 Chain Guide Swingarm Protector
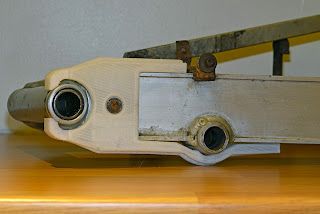 |
| fig1.1 - HPE chain guide for Yamaha FZ600 |
Intro
We have produced two chain guides / swingarm guards for the Yamaha FZ600 and early FZ400. We have a hard-wearing version in nylon and a TPU version which is more like the traditional rubber. This takes best advantage of an FDM 3D printer by producing a part in small batches to match the rarity of your motorcycle whilst also making them lighter than the OEM part.
The chain guide features increased wall thickness to allow the already highly wear-resistant material to last even longer. We expect the TPU part not to be as hard-wearing as the Nylon but it has the advantage of being cheaper and much easier to fit.
It is worthy of note however; that a poorly adjusted, unlubricated and/or rusty chain will make short work of eating through any chain guide.
Fitting Guide
The HPE TPU FZ600 chain guide will fit and remove in the same way as the OEM part, as it can flex and stretch into place. Use the Nylon fitting guide safe in the knowledge that you are having an easier time. If you find it a bit hard, try warming the part up near a radiator or using a hair drier. Be careful though, it can melt over 200 degrees C.
Fitting the HPE nylon FZ600 chain guide is best performed with the swingarm removed from the motorcycle. See it as a good opportunity to clean off old chain lube goo and to regrease those swingarm bearings.
Place the tophat washer on the inside of the rear bolt hole. If your top hat washers are missing, you can use a washer but take extra care later when tightening the bolts as damage to the chain guide is much more likely from over torquing.
 |
| fig2.1 |
Slide the back of the chain guide over the box section of the swingarm, taking care not to over stress the lower arm (it will break if you are rough with it or if very cold).
If you find it a bit hard to fit, try warming the part up near a radiator or using a hair drier. Be careful though, it can melt over 260 degrees C.
 |
| fig2.2 |
Rotate the chain guide till the the front jaws engage the front of the swingarm mounting tube.
Then fully installed, the chain guide should pass perpendicular to the swingarm inline with the path of the chain.
Install the forward bolt hole top hat and bolt with a small amount of threadlock but don't fully tighten yet.
 |
| fig2.3 |
Slide the swingarm back along the swingarm as far as the front bolt will allow so the front claws of the chain guide are snug against the front tube of the swingarm.
Install the aft bolt with a small amount of threadlock. Note this is under some tension as it pulls the guid tightly over the swingarm. If it is too tight, you may have to adjust the guide slightly (see the guide at the bottom of the install guide). Finally you can tighten the fitting bolts and reinstall the swingarm. Be careful not to over torque the two mounting bolts as you can crack the hollow plastic part.
Adjusting the fit of the chain guide
Should you need to make an adjustment to the fit of your chain guide, you will find the Nylon is very resistant to abrasives. A rasp or bastard file will seem a bit harsh but you need the cutting power to get anywhere with this material. Alternatively a reeming tool on a Dremel is very effective, however you will have to move the tool frequently and keep the speed down or you will melt the plastic. You have a little over 1mm of wall thickness till you will break into the interior of the chain guide. If you do, don't panic as you can easily fill the hole with a 2 part epoxy.
About
The reason we decided to design this part was due to a request from an CRMC racer who was building an FZ600 race bike. The chain guide on his bike was near non existent and it was no longer possible to get genuine or even a pattern part to replace it.
The first challenge was finding an original part to take measurements from. Thankfully a pile of ex John Warwick spares were on hand where a good one was found.
 |
| fig3.1 - a well progressed drawing on Fusion360 |
With the correct part identified, it was thoroughly cleaned of 30 years of chain lube so we could take measurements. Once the grubby work was done, the chain guide was drawn up on an evening using Fusion360.
 |
| fig3.2 - first draft in PLA |
The first test print was produced in PLA, a cheap biodegradable plastic. The fit was surprisingly good although being a firmer material than rubber, the plastic part was going to need some help where it couldn't stretch round parts quite as easily as the rubber did.
An optimised version was then printed in Nylon. This is a much less forgiving material to print with requiring a PETg raft and a lot of arguments with the printer.
 |
| fig3.3 - Improved version in Nylon |
With an increased radius round the rear shock mount and a few other tweaks, this version fits well whilst looking similar to the factory part.
The chain guide features increased wall thickness to allow the already highly wear-resistant material to last even longer. The face however remains 4 layers thick which helps show off the rectilinear infill. Not having a solid part dramatically saves on printing time, cost and weight.
 |
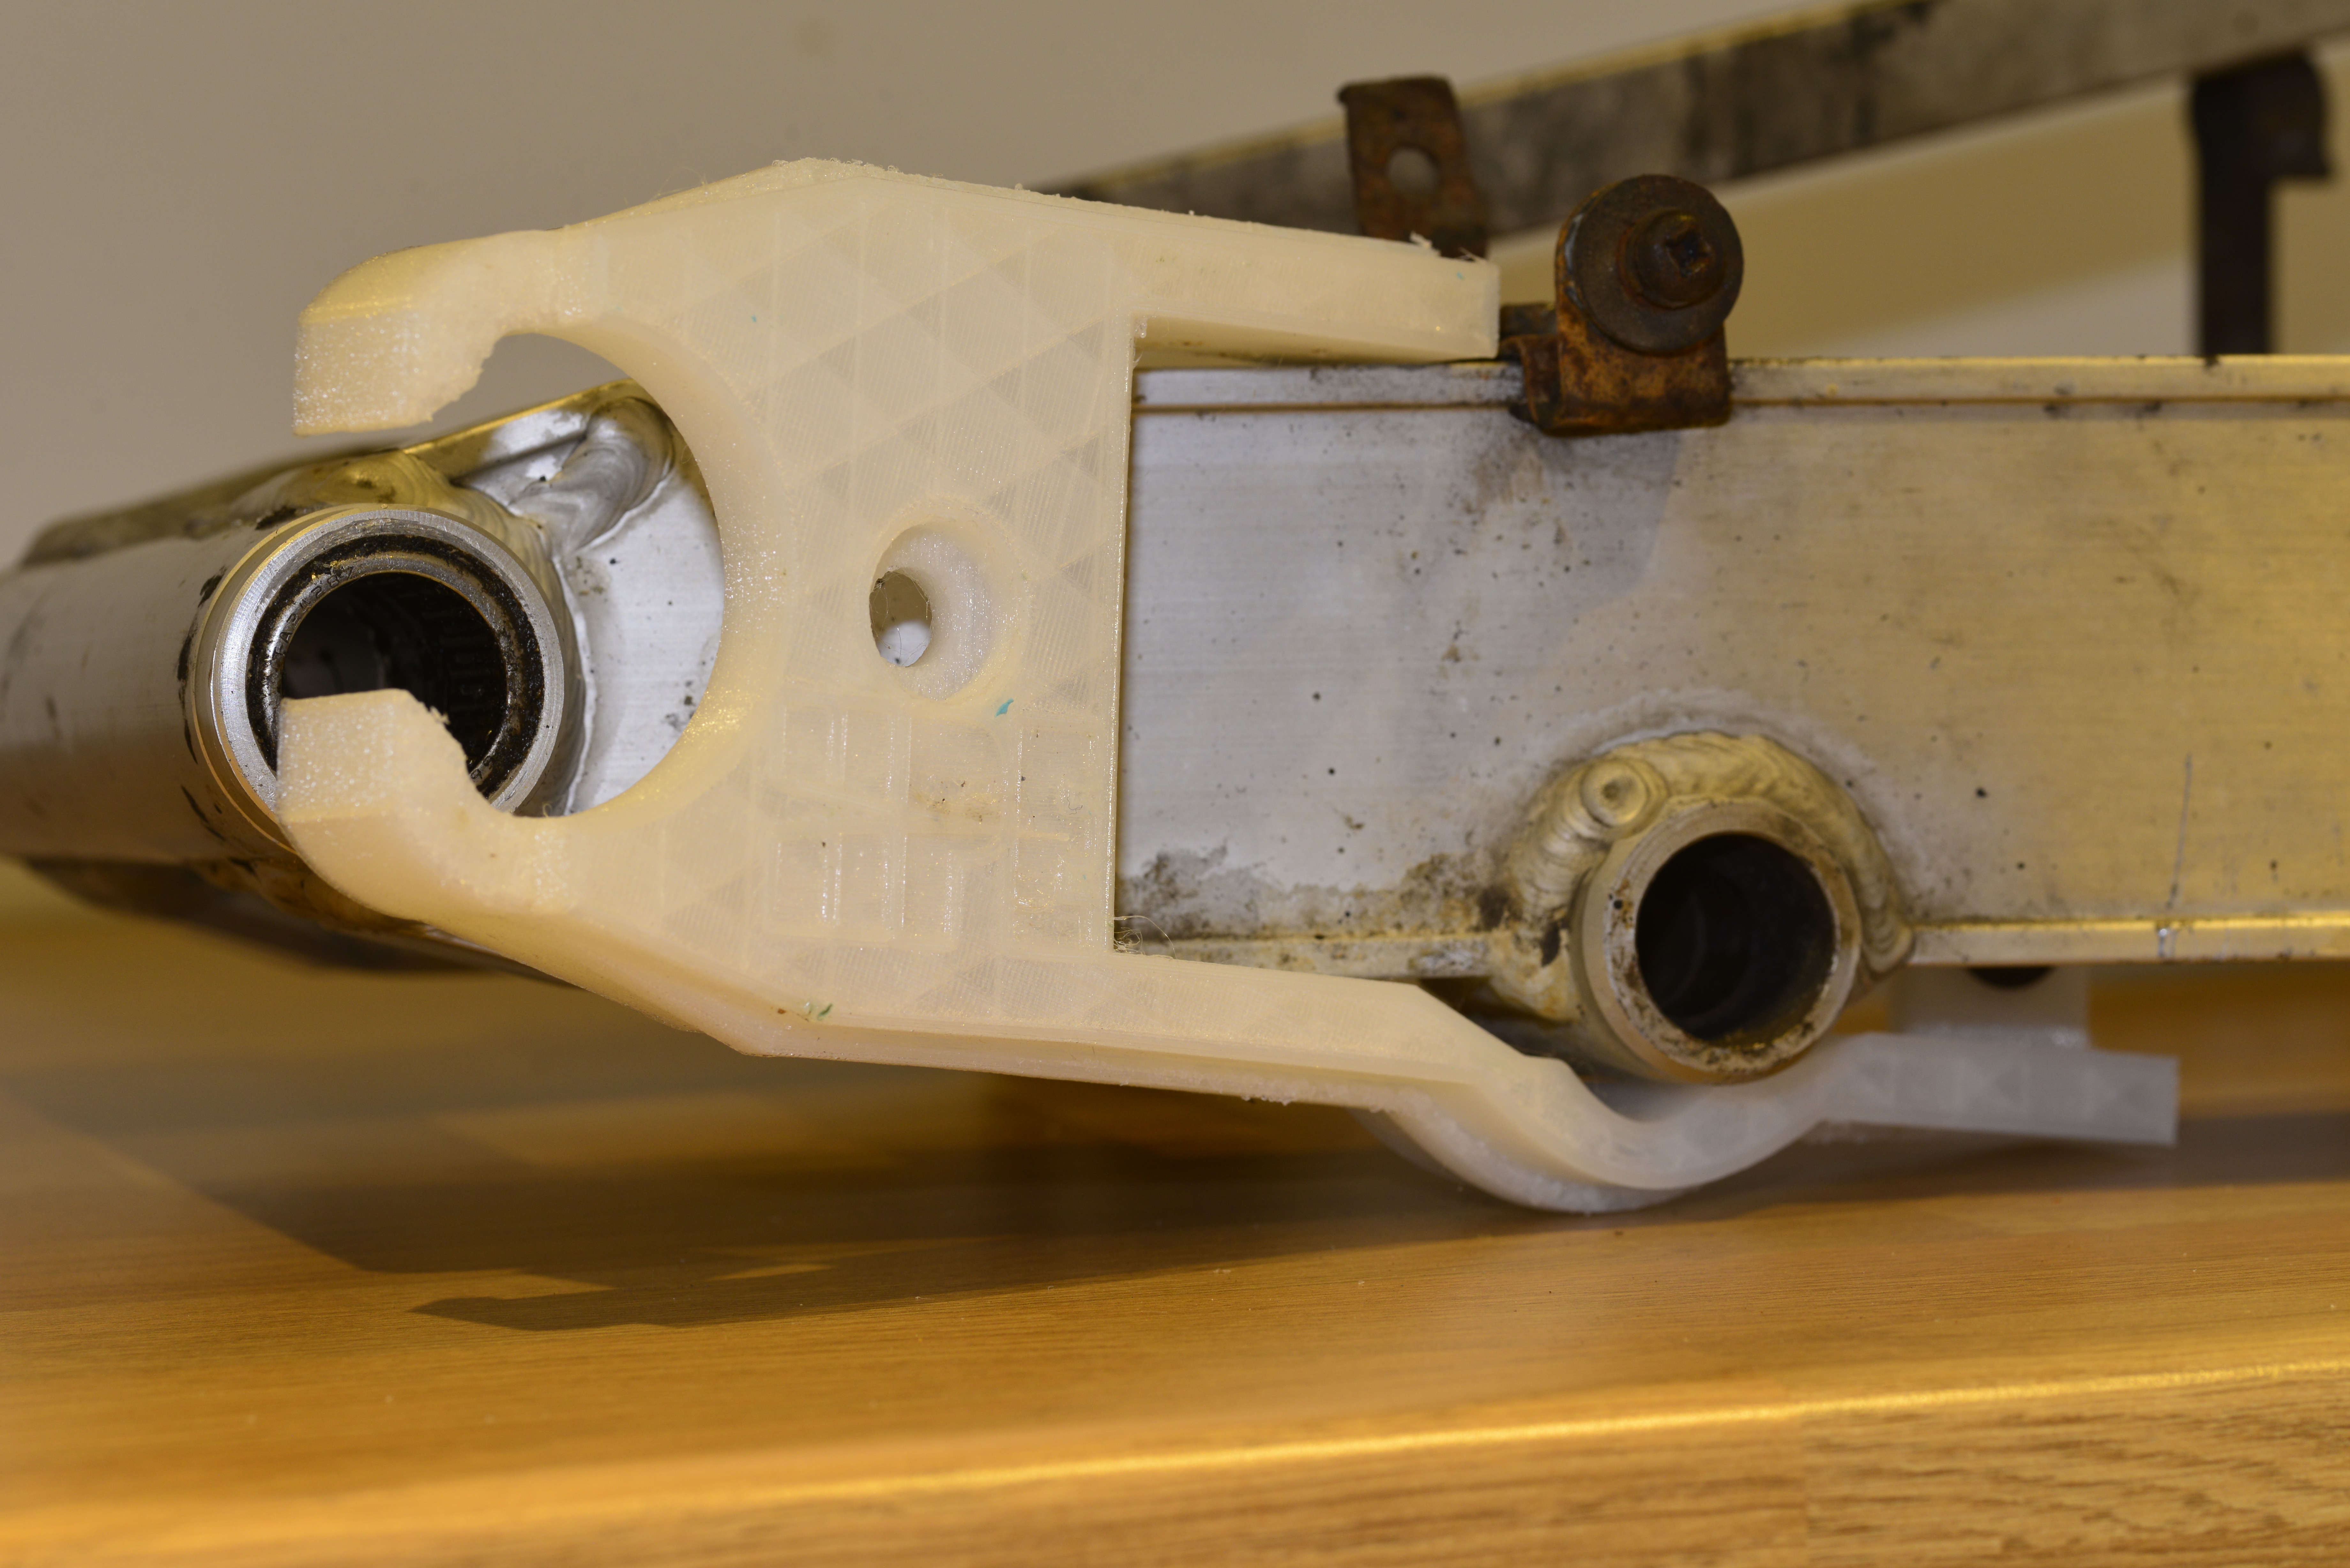
| fig3.4 - Interior detail |
This interior angle shown in fig 3.4 shows off the complex angles required to mount the guide so it is in line with the chain and not the swingarm itself. This also means all of the bolt holes are set at a different angle to the outer face. This is less important to get right on a rubber part but imperative on a hard plastic part.
 |
| fig3.5 |
The thin brace between the top and bottom arms of the chain guide were not carried over from the original. This choice was made as it sits slightly proud of the outer face of the chain guide which would add the need for a large amount of support material and the scarring that it brings. Furthermore our chain guide is much less flexible than the original rubber item so there is no real need for it. It would also get in the way during fitting so it was a no brainer removing it from our version.
Versions
Nylon
V8
Production version featuring a 3 layer wall and adaptive cubic infill for maximum strength and wear resistance without overly adding to the weight and cost. Printed with a .4mm nozzle and a .2mm layer height.
 |
| fig4.1 |
TPU
V8
Built on the shoulders of the Nylon version, a more rubber like and cheaper version was requested. Luckily we could achieve both using 95A TPU, cutting production and material costs whilst gaining a flexible.
The version number remains the same as the model has remained unchanged aside from material and post-processing.


Comments
Post a Comment